Monday, October 25, 2010

Billboards, Posters and TVs

You may be wondering how to insert custom pictures into your Active Worlds creations. They are found everywhere throughout Active Worlds and serve several purposes, such as decoration with posters and paintings, or advertisements.

As you can see in this screenshot from AlphaWorld's landing zone, you can see pictures are commonly used:


Most objects cannot have pictures placed on them unlike textures, but there are some objects designed to accept pictures on a particular surface such as TVs.

To insert pictures, there is the picture command that can be used like the texture command, but instead of listing a texture, the picture command has to refer to a picture located on the internet eg "www.example.com/example.jpg". The pictures that can be used are limited to the 'jpg', 'png', 'gif' and 'bmp' file types.

If you have pictures on your computer that you would like to use in Active Worlds, you can use an image hosting website such as ImageShack. After uploading the image, you can find the URL (web location) of the image by right clicking it and selecting 'properties'.

You can also find other pictures you might want to use by searching image hosting websites. But using images from other places on the web may not be okay without permission since it puts a larger demand on other's websites. Also be aware about copyright. Using images that do not belong to you may be illeagle.

Now that you can find an image, lets put it in the world.

Objects

Here are a few objects that take images:
  • tva2.rwx (large tv)
  • tva1.rwx (medium tv)
  • comp1.rwx (small computer)
  • ptv1t00.rwx (small tv)
  • tv1.rwx (small tv)
  • tv2bs.rwx (really thin tv)
  • tv3bs.rwx (medium tv)
  • ptv1.rwx (large tv)
  • ptv2bs.rwx (huge tv)
  • news1.rwx (news stand)
  • pictwll1.rwx to pictwll4.rwx (flat panels)
  • xpict1.rwx to xpict3.rwx (large picture frames)
  • pict1.rwx to pict6.rwx (medium picture frames)
  • pp00.rwx (transparent panel)
You can find these objects in the "Pictures" section at the AWNewbie object yard which you can go to by clicking here.

Making a Poster

First we will make a poster and put in a house. For this tutorial we will use 'pictwll1.rwx' to do this. Find a wall of your house or a building where you would like a poster to go. Duplicate the object, move it back a click and then rename it.

After making the object, it seems to be inside the wall, so we will move it out. A whole click is way too far so we will use one 'shift click'. If you have trouble selecting the object and you select the wall instead, try moving the wall away first and then moving each object into place.

Good. The picture command is just "picture" and then the URL of the desired picture (including the file name) is placed after that. Adding the create trigger to the front, an example completed picture command is "create picture www.example.com/example.jpg".

I have used image shack to host a picture which I will make my picture command refer to.
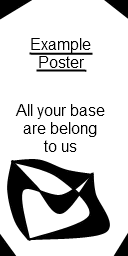
Here is the picture I will use as my poster:
It's location is http://img340.imageshack.us/img340/6716/exampleposter.gif. If you want to follow this tutorial exactly, feel free to use this image too.

And now I put the it in my pictwll1.rwx object: 

There seems to be a slight problem with my poster. The image is out of proportion, since the 'pictwll1.rwx' object is a perfect square, and my poster image is not. I will use this scenario as an example to teach you a new command: The scale command.

The Scale Command

The scale command is a command that changes size of an object in each of its three axes. With this command, you can make objects taller, wider, longer, shorter, bigger and smaller. I will use it to change the 'pictwll1.rwx' object into a shape which fits the poster image I'm using.

The command is entered as "scale" with the multipler for each axis typed afterwards, with spaces between them. The first number refers to the x axis, the second to the y, and the third to the z. If you have only one number, it refers to all of them. Remember that the y-axis is the height, x is the width and z is the depth.

For example: "create scale 2 1 1" will make an object twice as wide.
"create scale 1 0.5 1" will make an object half as tall.
"create scale 3" will make an object three times larger in each direction.

After my picture command, I'm going to add a comma and then my scale command. The numbers I will be using is 1, 2, and 1. This will make the picture object twice as tall, because the image is twice as tall as it is wide. So the completed commands in the action box will be: "create picture http://img340.imageshack.us/img340/6716/exampleposter.gif, scale 1 2 1".


Now my picture looks better. When trying to find the right proportion, I usually just guess the numbers a few times until the picture seems right. But if you want to make it exact, you can do maths to make sure the proportions are equal.

The poster is now complete. If you would like to make a framed painting, you can use a framed object instead.

The scale command is very useful and is one of the commands I most use. I will be demonstrating its use in more scenarios in future blog posts.

Making a Billboard

A billboard can be made in much the same way, the main difference is that it is larger.

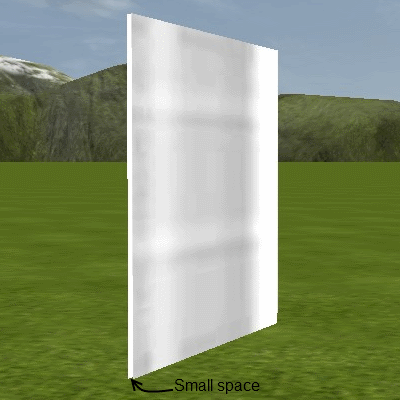
If you are using a 'pictwll' object as your billboard, the back of the image will also be shown. If this is not desired, then it can be solved easily. Simply duplicate the pictwll and move it back about one shift click. Then take the picture command off and give it a desirable texture. The small space between these two objects will be visible and will make the billboard messy. This can be solved by making a border. Alternatively, you could use a framed object, which already has a back to it but will not support textures very well.


I will now introduce some new objects: the 'cyl(x)a' objects. These are cylinders. The 'x' determines its length in clicks. 'x' can be 1, 2, 4 or 8. So "cyl4a.rwx" would be a valid object but not "cyl5a.rwx".


To make a border, you can put these cylinders on all sides. Billboards would also look nice with some supports to hold it in place, so you can use these cylinders for that as well. Feel free to give them whatever texture you desire.


If the cylinders are too thick and cover up too much of the poster, you can make them thinner with a scale command. "create scale 0.5 1 0.5" would make them half as wide, for example. You may also want to make the billboard image slightly smaller to reveal more of the edges.


The corners between the cylinders are slightly messy and you can fix this by making the top and bottom cylinders around the image slightly longer to cover the corners, then moving them into the centre again. There is also some z-fighting between the cylinders which can be fixed by slightly increasing the width of the top and bottom cylinders.

The values I used for the scale of these objects were 0.51, 1.05 and 0.51. Here is my completed billboard:


Making a TV

Lots of TV objects already exist. All you need to do is add a picture, but here it would be appropriate to try something new.  The picture command comes with an opportunity to frequently refresh the image, as often as you choose. This allows the viewing of webcams or other images that are constantly changing. A few users have actually made TV stations with shows based in Active Worlds, which is very cool. They work by having an online image file rotating through different images every few seconds.

You can learn about different television stations at the Active Worlds Wiki here. As I write this article, the only tv stations running are GCTV and SBN. GCTV has a nice website here and you can view it on your Active worlds TVs with the code "create picture gctvaw.com/tv update=10". This code will refresh the image every ten seconds, however the station sometimes goes offline. SBN, aka the Scarabian Broadcasting Network seems to have only one show running over and over, but you can still watch it with this code: "create picture www.swcity.net/tv update=5". I chose to update it every five seconds instead of ten because the image seems to update faster than that of GCTV.
As you can see, making the images regularly update is done by placing "update=x" after the URL of the picture, where 'x' is the number of seconds between each update.


That's the end of this tutorial, now go have fun, and remember you can visit Virtual Landscape's Active Worlds place here.

Saturday, October 23, 2010

Really Simple Doors

Here is a quick tutorial on building very basic doors. These doors will fit in a standard pd01.rwx and similar door frames. Users will be able to walk through them.

Step 1: Find a doorway.

Step 2: Create a "doorpic2.rwx" object and place it in the doorway. You can use a "doorpic2a.rwx" object instead to give it some thickness. You may have to use shift clicks to get the door into place.

Step 3: Give it a nice texture. Good textures to use are "thdoor1" through to "thdoor7". So add the code "create texture thdoorx" where 'x' is the number you want to use.

Step 4: Add the code "; solid off" to allow users to walk through it. Remember the semicolon. An example of the full code is "create texture thdoor3; solid off".

An example of a completed door
Your door is now complete!

Monday, October 18, 2010

Ground Cover

Ground cover is objects that make up a ground, different from the world terrain. This is usually done with large walk objects given a grass texture.

The purpose of ground cover is to protect your land from other users.  If there is a piece of ground not covered by an object at any height, other users can build there and therefore vandalise the area. This protection only works for citizens, though. If you are a tourist, ground cover offers no protection.

Another reason for using ground cover is so you can use textures of your own choice instead of the default terrain, and also to bring the ground level up to 0 on the y-axis with your buildings' floors. Having no ground would allow you to see underneath your buildings which would be unneat. Also, the reason for having your buildings above ground in the first place is to have a particular texture for your floors, rather than just grass.


To build ground cover, simply place walk or floor objects between and around your buildings, and give them an appropriate texture.

Some good objects are 'walk001.rwx', 'walk001h.rwx' and 'floor001.rwx'. The walk object with an 'h' at the end is ten meters long unlike the other one which is only eight meters long. If your buildings have floors of normal walk objects (ie without the 'h'), it will be easier to place ground cover with the same objects.


The 'floor001.rwx' object's small size makes it easier to use around buildings with more unusual floor layouts.


If the space between buildings aren't in sets of eight clicks, you can overlap your ground objects to seamlessly extend the ground in groups of four clicks. This works because the texture repeats every four clicks on these objects. Z-fighting still happens but it can hardly be seen because each object looks almost the same at each place they overlap.


If you need to place ground more precise than of four clicks, then you can overlap ground and avoid z fighting by slightly raising one of the objects, but this is slightly unneat. Another way is the scale command which I will talk about in a later blog post.

Some useful ground textures include:
  • terrain0
  • fall_g
  • grasso
  • walk1
These textures may be different or non existant in different worlds, but these all work in AlphaWorld and AWTeen. You can also experiment with putting different numbers after 'terrain' to find different terrain textures.

That's the end of this blog post, have fun.

Monday, October 11, 2010

Some Building Techniques and Tips

Here are a few things that will help you with building.

You know how to rotate things around their y-axis, but you may also need to rotate them in other ways, for example, to lay a vertical object on its side. To rotate something on its x-axis, use your 'Home' and 'End' Keys. To rotate something on its z-axis, use your '/' and '*' keys on your numpad.


In the swimming pool tutorial, you learnt how to use shift while moving objects to move them more precisely. It is possible to move them even more precisely. If you hold 'Ctrl' plus 'Shift' while moving objects, it is moved only a centermetre, which is a a fifth of a shiftclick and 50 times as precise as a normal click.

It is also possible to rotate objects with precision. Holding 'Shift' and 'Ctrl' + 'Shift' while rotating objects will rotate objects more and more precisely, respectively. Here is a table showing the exact values for movement and rotation:


Those are the important things to know, but here are a few more tips.

When flying, there are two options for movement. In the 'Options' menu in the toolbox, choose the settings option and then click on the 'General' tab. Here you can select the “Ignore pitch when flying / swimming” option, if you want. If it is disabled, you will move up and down when moving forwards and backwards while flying. I personally enable this option, since I like to stay at the same level when flying. This allows me to look down over buildings and other stuff and still be able to fly over them. I find it a lot easier to use.
Something else that may help while moving around is using brakes. Pressing '5' on the numpad while numlock is off will cause you to move slower and with precision, that is, you won't keep slowing down gradually when you let go of a key. Instead you will stop instantly. This is important for when you are working with small objects; without being able to move precisely you may move right past the objects when you just want to move a tiny amount.
The last tip is using 'Ctrl' + 'Insert' to duplicate objects. This will move an object a different amount when it is cloned. The distance from the original object is equal to the longest length of the object along the X axis or Z axis. Which in other words means the longest horizontal length is how far away the object will be when it is duplicated.

Using 'Ctrl' + 'Insert' can greatly increase the speed of building repetitive objects such as ground cover or path objects. It makes the duplicated objects spawn right next to the previous objects so that it can be pressed over and over to make a line of objects. I'll have a blog post with more about this feature later on.

Hopefully you have learnt something useful from those tips. Feel free to experiment. And have fun :)

Monday, October 4, 2010

Swimming Pool

In this tutorial, I will be introducing action commands. We will also be building a swimming pool which will include the use of the texture and solid commands.
Building the Swimming Pool
We will build the swimming pool's solid structure first and the water later.
The swimming pool will take up the area of four walk objects, arranged in a square. First, find a nice spot by your house or wherever you are building. Duplicate a nearby object and make it a "walk018.rwx" object. Move it so that it is alligned with and touching the building you copied it from and then move it away in groups of eight clicks (a click is one arrow press or half a meter), so that the space between the buildings are eight, 16, 24 clicks etc. This will allow ground cover to be neatly placed between the buildings.
Now you have a tiled floor piece of your swimming pool. If you want to use a different textured objects, don't hesitate to go to the object yard and find an object with a texture you like.

Clone your floor piece three times and place the other objects around it to make a square.

Now duplicate one of the pieces, move it 4 clicks upwards and make it a "floor18.rwx", or use a number giving you a texture you like. This is a quarter the size of the walk pieces. Move into a corner above one of the walk pieces. Now make a layer of these in around the sides of the lower square.

Good. Clone a piece and make it a "pp18.rwx" or a different numbered 'pp' object if you want. Align it to the with the outer edge of the square, and lower it so that it's top is level with one of the top floor objects. Move and duplicate this object so that it completely surrounds the outer edge. Then make it surround the inner sides of the top floors.

We have a basic pool structure with a walkway around the water area in the centre. But there are two more things that need adding: a rail around the outside and and stairs to get up onto the walkway from ground level, and also to get in and out of the pool.

There are several types of rail objects available. I'm going to use the "rail2t00.rwx" object but if you want to use a different one you can find them at the AWNewbie object yard. My rail object is 4 meters long, which is also as long as a single 'pp18' object. If you choose a different rail object, for the purpose of this tutorial, make sure it is the same length as the 'rail2t00' object.

Put the rail around the edge of the pool. If you duplicate it from one of the top floor objects, you will not need to adjust it's height. If you copy one of the walls, it will appear underground and to access it you will have to hold shift while flying downwards, to go through the ground. Make sure immediately press the fly up button or else you will keep falling downwards.

After you've put up the rails, on one side, delete the two inner rails to create a space for the stairs.

To make stairs, duplicate and object and rename it "stair03m.rwx". Put it outside the walkway and on the ground so that it's Y location is zero. You will notice that it is slightly above the ground. When you put ground cover around the pool, the stairs will line up with the ground cover. Rotate and move the stairs so that it lines up with the space between the rails. Make a second one and place them side by side so that they take up the whole space.

Then put two stairs on the inside of the pool area, on the opposite side of the walkway as the stairs on the outside.

Great, now we are up to the water and action commands.

Action Commands

Action commands go in the action box of an object. They consist of two parts: triggers and commands. Triggers determine when to activate the commands, while the commands perform an action on the object or other objects.

In this tutorial you will be using the "create" trigger. This trigger performs the commands when the object is seen by the user. The commands we will be using are the "texture" and "solid" commands. The "texture" command is used to change an object's texture while the "solid" command changes the solidity of objects, allowing users to pass through them without using shift. I will talk about all the other triggers and most other commands in later blog posts.

Water

First, duplicate an upper floor object and rename it as "walk000.rwx". This is a transparent walk object and will be our water. Put it in the middle so that it covers the pool part.

Now we will use an action command. First, in the action field of the object properties box, type "create". After that trigger, we can type a command. Leave a space and type "texture". This command requires that a texture name is written after it. The texture we want to make this is "water1", so leave a space after texture and then type that. Everything in the action field should now look like this: "create texture water1". Now deselect the object. It will now be updated to look like water! If it doesn't, check the spelling of the action commands.

Even though our water looks like water, it doesn't act like water, as we can walk over it. We need to use the "solid" command to allow us to walk through it (without using shift).

Select the object again. A second command is needed for the same trigger. To use more than one command, use a comma after the end of the last command. Then type the new command. What we need to type to stop the object being solid is "solid off". After the "solid" command, the words "on" and "off" determine whether the object is solid or not. The words "yes", "no", "true" and "false" also work.

Everything in the action field should now look something like this: "create texture water1, solid off".

There is one problem with our water though, there is a z-fighting issue between our water and our stairs. Z-fighting happens when two objects overlap each other or are very close to each other. It will result in part of both objects being drawn to the screen and it happens because the computer doesn't know which object is in front.

It is also unrealistic to have the water at this height. So we will move the water down. If we just move it down one, two or three clicks, they will still overlap parts of the stairs. The solution is to move the water with a fraction of a click.

To move objects more precisely, you can hold down shift. While holding shifts, you will move objects a tenth of a click with each button press. Move the water down one and a half clicks from the top by moving it down one click, then five shift-clicks.

The problem is now solved and the water is at a more realistic level.

Texturing the Stairs

There are no stair objects that have the same texture as the tiled 'walk', 'floor' and 'pp' objects. We don't have to put up with differently textured stairs, though. We can use the texture command on the stairs to make them the same texture. This particular tile texture is "tile4".

In each stair object, you need to place the code "create texture tile4". You don't have to type it in each time, just copy and paste it.

Now you have a completed swimming pool, great work!

More textures

Now that you know the texture and solid commands, you can now use them in your other buildings. I personally use the texture command with almost everything.

Here is a small list of commonly used textures to get you started with more stuff, however I will make a blog post later on dedicated to making a list of a lot more textures.

  • tile1 through to tile6 
  • stone1 through to stone15
  • brick1
  • water1
  • ocean4
  • wood1 through to wood8
  • metal1 and metal2

As well as object yards, there are texture yards out there which have lists and categories of textures. You will find links around the universe to them. For example, go to the landing zone of AlphaWorld and click the link to "Building Object Yards" underneath the number of objects sign. You will be taken to a group of teleports for object yards, but to the right is a group of teleports for texture yards.

Another good way to find new textures is to select objects by other people to find out textures they use.

That's all for this blog post. Now have fun doing more building!

Monday, September 27, 2010

Building Your First Home

Finding Somewhere to Build

First you must decide what world to build in. Here's a small list to get you started:

AWNewbie is a world designed for new users to learn to build. Building done here will be protected from other users; however it will also be very temporary and will be removed after a few days.

AlphaWorld is a permanent building world. It is the largest and oldest. Tourists can build here but without protection from others. AlphaMapper is a nice tool which can be of great assistance. I do all my building in AlphaWorld so my most of my building experience is with it and so most tutorials on this blog will be made for AlphaWorld.

AWTeen is a much smaller world. Tourists can build here but as the world is so small, there is a larger risk of being discovered and vandalized or deleted by others. There is also not as much empty space left, making finding a spot to build harder. Some advantages of building in AWTeen is the ability to edit the base terrain and having a larger selection of objects and textures available, and also having automatic access to some advanced building features which I won’t talk about on this blog until much later.

Mars and Yellowstone are themed worlds. They both allow tourist building and also have different objects to AlphaWorld. Yellow is very small, but Mars is larger.

I recommend using AWNewbie just for starting out, then moving to AlphaWorld.

If you are going to build in AWNewbie, you don’t need to go to much effort to find somewhere. As the world is very small, just walk along a path from the landing zone to find an empty field close by.

If you are going to build in AlphaWorld, you should use Alphamapper to find a large, empty area.

Other worlds may have a map, but if not, you can search random coordinates and see if there are any buildings nearby, eventually finding an empty place. If there are buildings, also try looking to see if there are empty areas near them.

Building the House

To build, you must first understand how building works in Active Worlds.

Structures are made out of lots of objects. These objects vary in complexity, from squares and rectangular prisms to chairs and computer monitors. They can all be manipulated by changing their size and shape, by changing their texture or color, or by several other ways which I will show you in later blog posts. Hundreds of objects are put together to create large buildings and almost everything in the world is made out of some objects. To create objects, other objects are duplicated and then the new object is changed into the desired object.

Now let’s start the tutorial. This will be for AWNewbie, however if you want to start building in AlphaWorld, you can. Just go down to the 'Moving to AlphaWorld' section of this post for more help.

First, go to the world through a teleport at AWGate or typing in AWNewbie in the teleport box. Then walk down a path until you find a small empty place to build at. There will be a tutorial in the form of several signs along each path, but I have my own tutorial here.

First you will need to get a password. Pressing F8 will toggle the whisper box below the chat. You need to whisper “password” to [GuardBot]. This is a bot who will assign you a password. You will need to remember the password unless you aren’t planning to continue editing your house after this tutorial.

Now you can start building. Make sure your Num Lock is turned off. To begin, find an object near your empty field and right click it, to select it. The fence or brick walls are suitable objects, but some of the signs aren’t suitable and the ground isn’t made of objects.

Selecting an object brings up the object properties box, which appears whenever you have an object selected. Using this box, you can manipulate the object. You will use this box more later but right now, press the insert button on your keyboard, or the duplicate object button on the box. Now, use your arrow keys to move the object away from the path. Move it with a distance of about 30 arrow key presses. Each arrow press moves the object half a metre, which is also known as a ‘click’.

Left click on something other than the selected object in the 3D view to deselect it. If the object disappears and you get a message saying “You are not allowed to encroach into another's property”, it means the object was in a space which was above or under an object that doesn’t below to you. Try duplicating an object again and moving it to a different location, farther away from the path

Once you have your object, make it snap to grid and reset its rotation with the appropriate buttons in the object properties box. Also delete anything in the ‘Description’ or ‘Action’ fields. In the ‘Model’ field, rename the object, “walk022.rwx”, then deselect it.


Congratulations! You now have the first floor piece of your house! If your object is way above the ground, press the minus key on your keyboard to lower it until its Y location is zero. Even though the object is at zero, it will still be slightly above the world terrain, which is good, so you can put your own ground around your buildings.

If the object goes back to what it was before and you also get an "not allowed to encroach" message, it means the object wasn't encroaching before, but when it became this larger object, it was. Just try moving the object further away.

It is a good idea to record the coordinates of your house so you can find it later on if you forget where it is. Remember that an easy way to record your house’s location is to use the ‘Remember’ option under the ‘Teleport’ menu.
Now duplicate your floor and place it next to the first one so that they touch. Then duplicate it again and place it in a different direction from the last one so that the floors form an ‘L’ shape. This will be the base of your house. I recommend flying up in the air a bit to be better able to build.


The next task is to make the walls. Duplicate a piece of floor and rename it “pp21.rwx”. This wall object is half the length of a piece of floor. Move it to the end of the edge of a floor. Now duplicate it and move it next to the first wall so that the two walls go along the edge of one floor piece. To continue placing walls along the floors, you will need to rotate them. Duplicate and existing wall and press ‘Page Up’ exactly six times. It should now be 90 degrees to the other walls. Move it to connect with the floor and existing walls. You can use ‘Page Down’ to rotate the other way.


As you move your walls, you will find that pressing the arrow keys in groups of four or eight times to get them in the right position. This is because they are four metres long, which measures as eight button presses. As you duplicate objects, the duplicates are one button press forwards, so be aware of this when moving objects in groups of eight presses.
Using your knowledge, you should now be able to finish making the walls. Do this now. To speed things up, you can select more than one object at a time by holding ‘Shift’ when selecting objects. These objects will move together and rotate around their centre. If duplicating it, it will produce the same objects as were selected in the same position. This can really speed up building the walls by selecting and duplicating two at a time.

If you ever find your objects at some weird rotation or misaligned with the rest of the objects, just try snapping them back to the grid and resetting their rotation. It is normal to see tiny cracks between these kinds of walls, though.

Now to make a doorway and windows. Select one of your wall objects and rename it “pd21.rwx”, changing the second ‘p’ into a ‘d’. Your wall is now a doorway. Select a different wall object and turn the second ‘p’ into a ‘w’ this time, so that the name is “pw21.rwx”. This will be a window. Feel free to make as many windows or doorways as you want. You could also make internal walls.


To put in a ceiling, select each floor piece (at the same time, if you want). Duplicate them, move them back half a metre and then press plus on your numpad eight times. They are now on top of your walls.


Now you will be using some more complex objects to make your roof. Duplicate a ceiling piece and rename it “roofc35.rwx”. This is a corner piece. Rotate it and move it into an appropriate position. Then duplicate it and put it on all your external corners.


Now duplicate another corner and take the ‘c’ out of the name so that it is “roof35.rwx”. This new object is a straight roof object. Put this object along the walls between the corner roof objects.


How are we going to make the internal roof corner? We don’t need a new object for this; we can place two straight roof objects intersecting each other. Make this corner now.


You have now built a nice house and have completed your first structure in Active Worlds! Good work.


Object Yards

Object Yards are places with categories of objects on display so that builders can come along and find out the name of objects they want, so then they can go back to their place and insert the new objects.

The object yard at AWNewbie will be very useful to you. It is found at 36s 40w. The walk, pp and roof objects had numbers in them, which determined their texture. At the object yard you will find other objects of the same type but with different textures, so feel free to change the numbers in the objects at your house to make them have the textures you prefer.

In different worlds you will be able to find different object yards, so visiting them is a good idea.

Furnishing your house

When you are at the AWNewbie object yard teleport circle, click the teleport to go to “Furniture and TVs/Stereos”. Then find some objects you like. Right click them to find their names, and write them down or put their names in a text document. If you want, you could just say them in the chat and you will be able to see them when you go back to your house.


For this tutorial I will be putting in a bed, a couch and a TV. Once you have found the objects you want, click the back button until are at your house again, or can fly there. The objects I have chosen are “gbed3d.rwx”, “couch5a.rwx” and “tva2.rwx”

Duplicate an object of your house and rename it as one of the objects you have chosen. Rotate and move it to where you want in your house. Then do the same for the other objects. You now have a furnished house and you also know how to find objects and put them in your house, good work.


Moving to AlphaWorld

Once you are happy with your ability to build in AWNewbie, you should consider starting to build in AlphaWorld. This is because your buildings will be removed after a few days in AWNewbie.

Starting out in a much larger world is harder since you would need to duplicate an object and move it a lot farther if you want empty space all around. You can build closer to other people’s random buildings if can put up with only being able to expand in three directions.

Your first object in a new area is known as a seed object. To get your seed object at a remote location, you have three options.

First, if you are a citizen, you can use a bot such as Seedbot to place an object at any location under your name.

Second, you could duplicate an object from the closest building and just move it with the arrow keys, watching its location in the object properties box to help you direct it to your desired location.

Third, you could ask another user who is a citizen to create a seed object for you. Then after you made a copy, you would need that user to delete their copy.

When you get your seed object, make sure you snap it to grid and reset it’s rotation. This is so that your entire town won’t get built on an angle or weird position, which will be a lot better and easier to use.

Building a new house in AlphaWorld like in this tutorial should be fast and easy, so you can do it again in your new location.

That concludes this blog post/tutorial, so have fun building and experimenting with new things! Remember I have a place in Active Worlds you can find here, which has much of the things I talk about in this blog.

Monday, September 20, 2010

Welcome to Active Worlds!

Have you ever wanted to create your own virtual homestead, forest, city or social hangout? How about exploring places made by others? Wouldn’t it be even better if you could do those things with your friends? Or what about making new friends? In Active Worlds, you can do all of these and more.

Active Worlds is a virtual 3D world browser. It allows chatting to others, exploring huge worlds and the ability to construct your own place. There are hundreds of worlds and thousands of users. The largest world, AlphaWorld is 655 kilometers both long and wide and it contains somewhere around 222 million objects.

The types of locations or buildings you can create in Active Worlds are almost limitless. You can create stuff like waterfalls and landscapes, spaceships, fantasy castles and automated factories, which are only a small sample of what’s possible.

Apart from building just personal homes, you can build social areas that you can hang out at with your friends, educational places users can visit to learn things, places to give slideshow or media presentations, and shops designed to showcase products with links to websites where they can be bought in real life. Even other types of places, if you can think them up.

This blog will include a set of tutorials on using and building in Active Worlds, as well as ideas on things you could use in buildings or cities, and maybe some other things like building competitions.

Using Active Worlds is free. Talking, exploring and building are all free. However a subscription option is available. Free users are known as tourists while subscribing users are known as citizens. Citizens get more features than tourists, the most important of which is preventing other people from destroying your buildings.

As a free user, however, you are still able to feel safe about your buildings. AlphaWorld is so huge that you can pick a remote location and it is likely no one will ever find your place. There is only a danger if you invite untrustworthy users to visit your place. And if you are just inviting your friends you already know, you should be able to trust them not to ruin your construction efforts. You can also build very temporary buildings with protection if you build in the world ‘AWNewbie’.

Getting Active Worlds

In this first blog post I will be showing you how to move around and explore the worlds. But first, is downloading, installing and logging into Active Worlds.

The first thing you need to do is go to http://www.activeworlds.com/. Here you can download the Active Worlds browser by clicking on the “launch” button in the sidebar on the left. Then download and install by following the instructions. When you get to start, it will ask you who you want to be and your email address. Who you want to be, will be your username that other people will see you as in the world. I have never noticed any use for the email address you enter but you must enter one anyway. I don’t think it matters if it is real or not.

Once you’ve done that, the browser will open and you will be in the world ‘AWGate’.
 
The Active Worlds universe is divided up into lots of different worlds. The default world is AWGate, which is where people are usually chatting and with some information, help and teleports, but not much more. No building can be done here as AWGate’s purpose is to act as a gateway for new users.

Movement

Now you will learn how to move around. Keep in mind some of these movements require that Num Lock is turned off.

First, you can use the arrow keys to move forwards and backwards and to turn left and right, very simple. Holding ‘Ctrl’ will make you move and turn faster.

‘Shift’ is more complex. Holding ‘Shift’ will make you strafe left and right instead of turning left and right, and you will also move through solid objects if the particular world you are in allows it.

Flying can be achieved by pressing the plus and minus keys on the numpad. This is fun and also allows you to move around a lot faster.

Jumping is done by pressing ‘Insert’ on the numpad.

As well as moving around, there is other important information to navigate Active Worlds. To change your view between first person and third person views, click the options on the toolbar, or press ‘End’ to cycle through them. You can also press ‘Home’ on your keyboard to get straight back to first person view.

When you are in a third person view, you can press the ‘/’ and ‘*’ buttons on your numpad to zoom in and out.

To look up and down in first person, press ‘Page Up’ and ‘Page Down’. Holding ‘Ctrl’ will also make you look up and down faster.

An important option for seeing is the visibility setting. Higher settings mean you can see farther but the view will be slower to render. The float option automatically changes your visibility setting depending on what your frames per second (fps) are, to keep your fps at about the same rate.


Exploration
 
Now it’s time for exploring.

There is a menu that you can access by pressing F9. The Worlds Tab in this menu provides a list of worlds in order of how many people are in each world. You can use this list to find other worlds. In the Teleports Tab is a list of teleports to locations inside worlds to which you can add more teleports. But you would only be adding to your personal list of teleports.

The oldest world is AlphaWorld, and it is the largest world with the most building having been done here. Some other fun building worlds are Mars, AWTeen and Yellowstone which are also great worlds to explore. AWTours is a world designed to give you a tour of the Active Worlds universe with lots of teleports. If you click the links in the teleports tab, you will be instantly teleported to the landing zone of that world. The landing zone is the default place users go when teleporting to a world.

There will usually be teleports or paths to other places around those worlds. You can use those teleports or just fly around to explore. Teleports are sometimes in the form of large signs or billboards advertising locations in worlds or other worlds. To use them, just click on them. But not all billboards or signs are teleports.
 
An important feature of Active Worlds is the teleport menu. In the toolbar at the top of the program next to ‘File’ is ‘Teleport’. The ‘Forward’ and ‘Back’ options take you forward and back through teleports you have done while in the Active Worlds universe, like the buttons in an internet browser as you click links. These options are also in the form of buttons in the toolbar of icons.

The ‘Remember’ option adds your current location to the list of teleports in the teleports tab, under a name you choose.

Clicking the ‘Home’ option will take you to your default spawn location, the place you go to when you enter Active Worlds. The ‘Make This My Home’ option makes your current location to be your new spawn location.

‘To…’ brings up a box where you can enter a world name and a set of coordinates, where you will be teleported to. To enter the coordinates, you enter a number of the North or South coordinate followed by an ‘n’ or an ‘s’, to represent North or South respectively. Then leave a space and do the same except entering an ‘e’ or a ‘w’, for East or West respectively.
 
If you want to the centre of a world, then it doesn’t matter if you enter ‘n’ or ‘s’, ‘e’ or ‘w’. If you want to go to the landing zone of a world, just leave the coordinates box blank.

Here is a list of the names of some popular worlds that can be used in the teleport box:
 
• AWGate
• AWNewbie
• AW (AlphaWorld)
• AWTeen
• AWSchool
• AWTours
• Mars
• Yellow (Yellowstone)
• Metatropolis
• Atlantis
• Colony

Keeping track of your location and direction that you are facing can be helpful. The Window bar of Active Worlds will tell you the world you’re in, the coordinates and the direction you are facing. Knowing this will let you know how to tell others where to find you, and can help you know which way to travel to get somewhere nearby.


If you are exploring AlphaWorld in particular, then a useful tool would be AlphaMapper. AlphaMapper is a map of AlphaWorld. It is still very useful, despite being out of date by a couple of years. It has the same interface as Google Maps and you can zoom in quite far. A useful feature is ‘Teleport to Location’ which takes you to the exact location you are looking at on the map.
Some websites have lists of places to see in Active Worlds. For example you can go the Awportals website for places in AlphaWorld here or AWTeen here. Active World’s own wiki has lists of communities that can be found here and the newsletter usually has a section on sights to see, a great resource for exploring. 

Lastly, talking to other users may help you find new places. They may have their own buildings or communities they would like to show you.

My blog has a place in AlphaWorld which will include much of the things I talk about on my blog, and you can find it here.

That concludes this blog post. Have fun!